Master the Trezor Safe 3 hardware wallet with our step-by-step setup guide. Learn security best practices, backup strategies, and how to protect your crypto assets from day one.
The cryptocurrency landscape has shifted dramatically. Over 2 million holders worldwide have recognized that self-custody through hardware wallets isn’t optional—it’s essential. Yet most newcomers approach their first device with uncertainty, unsure whether they’re setting it up correctly or missing critical security steps.
The Trezor Safe 3 has emerged as the default choice for new crypto users entering the market in 2026. Its combination of enterprise-grade security, transparent open-source design, and accessible $79 price point removes the traditional barrier between casual investors and institutional-grade protection.
Get your Trezor Safe 3 today and start securing your crypto assets with confidence.
This guide walks you through everything from unboxing to advanced backup strategies. You’ll understand Secure Element technology, implement PIN protection, and configure Shamir Backup for maximum resilience. By the end, you’ll have the knowledge to secure your portfolio like a professional.
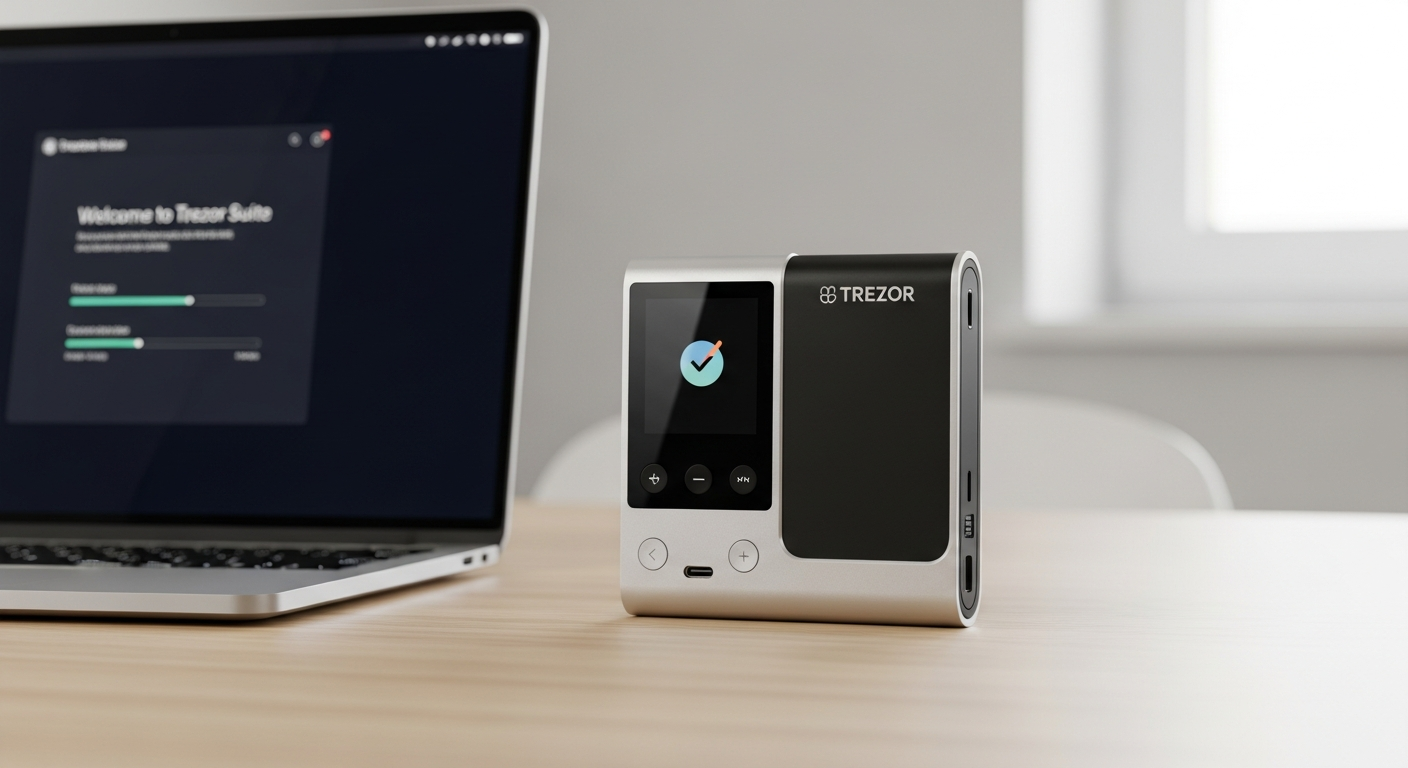
Unboxing & Initial Hardware Inspection: What You’re Actually Getting
What’s Included in the Box and Why Each Component Matters
Opening your Trezor Safe 3 package reveals a deliberately minimal setup. Inside, you’ll find the device itself, a USB-C cable for connectivity, documentation with important setup instructions, and recovery card templates for writing down your seed phrase. This minimalist approach reflects Trezor’s philosophy: security through simplicity, with no unnecessary components that could introduce vulnerabilities.
The recovery cards are particularly important. These physical templates guide you through writing your recovery seed offline, away from digital devices that might be compromised. This single document often determines whether you retain access to your funds during a device failure or loss.
Physical Specifications: Compact 59 x 32 x 7.4mm Design Optimized for Portability
The Trezor Safe 3 measures just 59 x 32 x 7.4 millimeters and weighs 14 grams—roughly the size of a standard lighter. This compact footprint makes it genuinely portable without sacrificing build quality. The device fits easily into a pocket, bag, or travel kit, enabling you to carry your financial security with you.
The small form factor doesn’t compromise durability. The hardware withstands the temperature range of -20°C to +60°C, making it suitable for various storage conditions without performance degradation. Whether stored in a home safe or carried while traveling, the device maintains consistent functionality.
USB-C Connectivity and Two-Button Navigation Interface Overview
The Trezor Safe 3 connects exclusively via USB-C, the modern standard for device communication. This wired-only approach—notably lacking Bluetooth—actually enhances security by eliminating wireless attack vectors. You’ll connect the device to your computer or supported mobile device only when actively transacting or managing your wallet.
Navigation happens through two physical buttons rather than a touchscreen. This design choice deliberately trades intuitive touch interaction for genuine security. Touchscreens require larger surface areas and more complex processors, both of which expand the attack surface. Two buttons mean simpler hardware, fewer potential vulnerabilities, and ironically, faster navigation once you understand the button combinations.
Verifying Authenticity and Checking for Physical Tampering
Before proceeding with setup, verify your device’s authenticity. Check the Trezor website for your device’s serial number to confirm it was manufactured legitimately. Examine the physical unit for signs of tampering—loose components, obvious wear inconsistent with a new device, or damage to seals.
The packaging itself provides security information. Trezor devices ship with integrity seals that show obvious signs of opening. If the seal appears compromised, contact the retailer immediately rather than proceeding with setup. This verification step takes thirty seconds and prevents catastrophic security failures.
Understanding the 0.96-Inch OLED Display and Why Size Matters for Security
The 0.96-inch monochrome OLED display with 128 x 64 pixel resolution seems minimal by modern smartphone standards. This constraint is intentional. The small screen prevents users from making careless mistakes when verifying transaction details—if you can’t comfortably see what you’re approving, you’ll naturally slow down and verify carefully.
The OLED technology ensures crisp, readable text even in low light conditions. The display runs independently from the main processor, adding another security layer. Critical information like recovery seeds and transaction confirmations appear on this isolated display, never on your connected computer, preventing malware from intercepting sensitive data.
The CC EAL6+ Secure Element Explained: Why This Changes Everything
What CC EAL6+ Certification Actually Means for Your Security
CC EAL6+ represents the highest standard of security certification available for commercial hardware devices. This certification means the Trezor Safe 3’s Secure Element has undergone rigorous testing by independent security laboratories. They’ve examined resistance to physical attacks, side-channel analysis, and sophisticated tampering attempts.
The “EAL” designation reflects the Evaluation Assurance Level. EAL6+ specifically means protection against attacks by skilled adversaries with specialized equipment. This isn’t theoretical security—it’s certified protection against realistic physical threats that other hardware wallet manufacturers ignore.
How the Secure Element Protects Against Brute-Force Attacks and Physical Tampering
Inside the Trezor Safe 3 sits a certified Secure Element—essentially a specialized chip isolated from the main processor. This chip performs all cryptographic operations related to your private keys. Even if someone gains physical access to your device, they cannot extract the keys through conventional hacking methods.
The Secure Element implements rate limiting on PIN attempts. After several incorrect entries, it permanently locks the device, rendering brute-force attacks impractical. Traditional computers might be cracked through repeated attempts; the Trezor Safe 3’s Secure Element makes this approach impossible.
Physical tampering triggers protective responses. Attempts to probe the chip’s internal structure, remove it, or analyze its power consumption all result in key destruction. The device erases your private keys rather than allowing extraction, protecting your assets even under extreme physical duress.
Comparing Trezor Safe 3’s Secure Element to Competitors’ Approaches
Many hardware wallet manufacturers use general-purpose processors without dedicated security elements. This approach reduces manufacturing costs but leaves private keys exposed to potential compromise through sophisticated attacks. The Trezor Safe 3’s dedicated Secure Element represents the premium approach.
Some competitors employ closed-source security chips, preventing community auditing. Trezor combines the Secure Element with fully open-source firmware, allowing independent security researchers to examine and verify the implementation. This transparency provides confidence impossible with closed-source alternatives.
The CC EAL6+ certification adds third-party verification. Rather than relying solely on manufacturer claims, you benefit from independent laboratory testing and ongoing compliance monitoring.
The Difference Between Open-Source Firmware and Closed Security Chips
The Trezor Safe 3’s firmware is completely open-source, available for community review and audit. This transparency means security researchers worldwide can examine the code, identify vulnerabilities, and suggest improvements. Closed-source competitors keep their code secret, preventing external verification.
However, the Secure Element itself necessarily remains partially closed—that’s the nature of certified security hardware. Trezor manages this through careful architectural separation. The open-source firmware handles most operations, while the Secure Element performs only the most critical cryptographic functions. This hybrid approach balances transparency with genuine security.
Discover why the Trezor Safe 3’s architecture is trusted by over 2 million cryptocurrency holders.
Step-by-Step Setup Process: Getting Your Device Ready for Crypto
Downloading and Installing Trezor Suite on Desktop or Web Browser
Begin by visiting the official Trezor website and downloading Trezor Suite, the management application for your device. The desktop version (available for Windows, macOS, and Linux) offers full functionality. Alternatively, the web version works directly in your browser for basic operations.
Before installation, verify the downloaded file’s hash against the values published on Trezor’s website. This confirmation ensures you’ve received the legitimate application and not a malicious substitute. The verification process takes two minutes and prevents catastrophic security compromises.
Initial Device Connection via USB-C and Firmware Verification
Connect your Trezor Safe 3 to your computer via USB-C cable. Trezor Suite automatically detects the device and offers a setup wizard. The application first checks your device’s firmware version and offers updates if necessary. Always apply firmware updates immediately—they patch security vulnerabilities and improve functionality.
During this process, the device displays a unique code on its OLED screen. Verify that this code matches the one shown in Trezor Suite. Matching codes confirm genuine communication between the application and your device, preventing man-in-the-middle attacks on an unsecured network.
Creating Your Recovery Seed: Why These 12-24 Words Are Non-Negotiable
The setup wizard guides you through generating your recovery seed. This sequence of 12 or 24 words represents your complete financial backup. If your device is lost, stolen, or stops functioning, this seed restores your entire wallet on any compatible device.
The seed generation happens on the device itself, never on your computer. The Trezor Safe 3 creates random entropy on its isolated processor and generates your seed without connecting to the internet. This approach guarantees that only your device knows your recovery seed initially.
Choose the 24-word option rather than 12 words. While both provide excellent security, 24 words offer additional protection against future attacks as cryptography evolves. The extra time required to write 24 words represents minimal inconvenience compared to the security enhancement.
Writing Down Your Recovery Seed Safely (Physical Backup Best Practices)
When the device displays your recovery seed, you’ll write it on the physical recovery cards included in your package. Use the provided template—it guides proper formatting and organization. Write clearly and deliberately, checking each word against the display before moving to the next.
Never photograph your seed phrase. Digital images can be recovered from device storage long after deletion. Never type your seed into computers or mobile devices. Only pen and paper—the recovery cards provided in your box—should capture this critical information.
Store your written seed in a location physically separate from your Trezor Safe 3. If both are kept together, a single theft compromises everything. Consider using a home safe, safety deposit box, or geographic distribution across trusted family members. The distribution method depends on your threat model and comfort level.
Some users create redundancy by writing multiple copies and storing them in different locations. This approach protects against fire, flood, or other physical disasters that might destroy a single backup. The goal is availability during genuine need combined with protection against theft or unauthorized access.
Setting Up Your PIN Code with Proper Strength Guidelines
After backup completion, create a PIN code. This 4-to-50 digit code protects your device against casual access. Unlike recovery seeds, you must remember your PIN—you cannot retrieve it if forgotten. The device allows PIN attempts, and repeated failures eventually lock the device permanently.
Create a PIN that balances memorability with security. Simple sequences like “1111” or “1234” offer minimal protection. Aim for at least 6 digits combining numbers in non-obvious patterns. Personal information like birthdays or phone numbers provide poor security—use genuinely random sequences you can still recall.
Test your PIN entry several times before completing setup. The two-button interface takes adjustment, and fumbling during an actual transaction wastes time and creates anxiety. Practice until PIN entry becomes automatic.
PIN & Passphrase Protection: Layering Your Security Defense
How PIN Protection Works on the Trezor Safe 3 Hardware Level
The PIN protects against unauthorized access to your device and funds. When powered on, the Trezor Safe 3 requests your PIN before unlocking. Even if someone gains physical access to your device, they cannot access your funds without knowing this code.
The Secure Element implements rate limiting. After ten incorrect attempts, the device locks for increasing durations. After multiple lockout periods, the device becomes permanently disabled. This design makes brute-force attacks impossible—an attacker cannot systematically try all possible PINs.
The PIN is verified by the Secure Element, not the main processor. This architecture prevents malware on your computer from capturing PIN entries. Even if your desktop is fully compromised, the PIN remains secure.
PIN Entry Via Two-Button Interface: Navigating Without a Touchscreen
PIN entry on the Trezor Safe 3 uses an innovative approach. The display shows a numeric keypad grid. The two buttons scroll through available numbers. This seemingly cumbersome method actually prevents observation attacks—watching someone’s button presses provides no information about which PIN they’ve entered.
The interface randomizes the keypad layout on each entry. This prevents attackers from inferring your PIN through repeated observation of your hand movements. Even a camera recording your device use cannot determine your PIN.
Practice PIN entry before relying on it during transactions. The interface becomes intuitive quickly, but initial attempts feel awkward. Familiarization prevents mistakes during time-sensitive transactions.
Creating a Strong PIN That’s Memorable but Secure
Your PIN should be genuinely random while remaining memorable. Avoid sequential numbers, repeating digits, or patterns that could be guessed through knowledge of your personal information.
Consider using a memorable phrase converted to numbers. For example, “HELLO” could become “48-35-12-12-24” using phone keypad encoding. This approach creates genuinely random sequences that you can reconstruct from memory.
Write your PIN nowhere. Ever. Unlike your recovery seed, your PIN should exist only in your memory. If you cannot remember it, you’ve chosen poorly. Consider simplifying your PIN if you cannot reliably recall it after two weeks.
Understanding Passphrase Functionality and When to Use It
A passphrase adds an additional layer beyond your PIN. Where the PIN unlocks your device, the passphrase derives your actual wallet from your recovery seed. Different passphrases generate different wallets from the same seed—an advanced feature for sophisticated users.
Passphrases protect against recovery seed compromise. If someone obtains your written seed, they still cannot access your funds without your passphrase. This approach enables what’s called “plausible deniability”—you could provide your seed to compel funds transfer while remaining protected by your passphrase-locked primary wallet.
Most new users should skip passphrases initially. The feature introduces complexity and recovery challenges. Master basic PIN protection first, then explore passphrases once comfortable with your device’s operation.
Shamir Backup (Multi-Share Backup): Advanced Recovery Without Single Points of Failure
What Shamir’s Secret Sharing Algorithm Accomplishes for Your Backup
Shamir’s Secret Sharing transforms your single recovery seed into multiple independent shares. Each share alone reveals nothing about your seed. Only when combining a sufficient number of shares can you reconstruct your complete recovery seed.
This approach eliminates the single point of failure inherent in traditional backups. A standard recovery seed in one location represents maximum vulnerability—if discovered, all funds are compromised. With Shamir Backup, each individual share is useless to an attacker.
The mathematical properties are elegant. With proper configuration, you might create five shares where any three can reconstruct your wallet. Losing two shares causes no damage. All five locations would need to be discovered to compromise your funds.
How Many Shares You Need to Recover Your Wallet (Threshold Settings)
The Trezor Safe 3 allows you to customize your Shamir configuration. You determine two variables: total shares created and threshold shares required for recovery. A 2-of-3 configuration creates three shares where any two reconstruct your wallet. A 3-of-5 configuration creates five shares where you need any three.
Higher threshold values increase security. A 2-of-3 configuration means two locations must be discovered. A 5-of-7 configuration requires discovery of five locations—statistically unlikely for most threat models. Balance security against the practical complexity of managing multiple shares.
The mathematical relationship is simple: if your threshold is too low, security decreases. If too high, recovery becomes impractical. Most users find 2-of-3 or 3-of-5 configurations comfortable—high security without overwhelming complexity.
Distributing Shares Across Multiple Locations and Trusted Individuals
After generating shares, store each in a physically separate location. Keep one share at home in a safe or secure drawer. Store additional shares with trusted family members or in safety deposit boxes. Geographic distribution protects against local disasters—fire, flood, or theft won’t simultaneously compromise all shares.
Communicate your configuration to relevant individuals without revealing the shares themselves. Family members should know that shares exist and understand their general purpose without learning which share they hold or how many are needed for recovery. This knowledge enables recovery assistance if you become incapacitated.
Consider custody arrangements carefully. Shares held by others represent potential weak points if those individuals face pressure to reveal them. Balance the benefits of distribution against the security implications of involving additional parties.
Setting Up 2-of-3, 3-of-5, or Custom Share Configurations
The Trezor Safe 3’s Shamir Backup feature guides you through configuration during setup. Select your preferred threshold and total share count. The device generates your shares and displays each one sequentially for recording on physical backup cards.
Each share appears as a distinct sequence of words. Write them carefully on separate recovery cards, labeling each with its share number. Never mix shares from different configurations—if you create multiple Shamir backup sets, ensure clear separation.
After all shares are written and stored, test your configuration with one share to confirm everything works properly. This verification ensures you haven’t made transcription errors before relying on your backup during an emergency.
Your Trezor Safe 3 Journey Starts Here
The Trezor Safe 3 represents genuine progress in affordable hardware security. For $79, you’re obtaining CC EAL6+ certified protection that previously required significantly higher investment. The open-source architecture provides transparency that many competing devices cannot offer. Support for thousands of cryptocurrencies means you won’t outgrow your device as your portfolio diversifies.
Your path forward is straightforward. Begin with the fundamentals: complete the setup process, write your recovery seed with care on physical backup cards, and establish a PIN you’ll remember reliably. Test everything with small transactions before committing substantial funds. Once comfortable, explore passphrases and multi-share recovery options if your threat model demands additional sophistication.
The security principles here represent best practices that extend beyond the Trezor Safe 3. Offline key generation, physical backups, hardware-level PIN protection, and separation of concerns between security chips and general processors—these concepts protect your digital assets regardless of specific device.
Your cryptocurrency holdings deserve genuine protection. The Trezor Safe 3 makes that protection accessible and practical rather than complex and expensive. Begin with unboxing and initial setup, progress through PIN configuration, then explore advanced features at your own pace. Your financial security depends on these initial steps.
Start your Trezor Safe 3 setup today and join millions of secure cryptocurrency holders worldwide.